Originally, ADB transfers through USB and TCP, which are both “stream”s that doesn’t have a packet boundary. So ADB defined its own packet format.
In this post I will explain:
- ADB packet format;
CNXNandAUTH, the two packet types used to establish a connection to a device;- How did I implement this.
- Terminology
- Transportation
- ADB Packet
- First packet
- Auth
- Implement authentication
- Complete
- What’s next
Terminology
As I talked in part 1, ADB has three parts:
- daemon: Runs on device, handle requests
- server: Runs on computer, forward requests from client to daemon
- client: Runs on computer, take user input and send requests to server
Actually there are two protocols: One between client and server, and another between server and daemon.
However, in WebADB there is no split between client and server, it exposes APIs that send requests to daemon. In another word, I’m implementing the protocol used between server and daemon.
So from now on, I will call WebADB as client, and daemon is still daemon.
Transportation
Native ADB implementation transports data over USB or TCP, and the code was mixed together. I have seen some commands relies on specific transportation and caused some bugs.
My principle of managing project is that:
- A project will start from a single file to quickly validate many design ideas
- When file size grows, I begin to separate parts to become its own module
- When doing that, I also think about the possibility to have an alternative implementation for each module
- Two is enough. If a module may have another implementation, I will define an interface and decouple the exist implementation from other parts.
For transportation, I can easily came with multiple implementations:
- Use WebUSB API in browsers
- Use some other USB library in Node.js (with a different API)
- Use the
netmodule in Node.js to transfer over TCP - Maybe use WebSocket in Node.js and browsers, with a custom forwarder running on device
So I defined a AdbBackend interface, containing a pair of read and write methods.
The constructor of Adb class takes an AdbBackend instance and use it to transfer data. I also refactored existing code to become the first AdbBackend.
Now the ADB class and the AdbWebBackend class are in separate packages. The whole @yume-chan/adb package uses only standard ECMAScript APIs so it can be used in any JavaScript runtime. While @yume-chan/adb-backend-web package uses many Web APIs and can only runs on browsers.
ADB Packet
ADB transfers data in packets. A packet contains following fields.
| Field | Type | Description |
|---|---|---|
command |
uint32 | Type of the packet |
arg0 |
uint32 | Has different meaning defined by command |
arg1 |
uint32 | Has different meaning defined by command |
payloadLength |
uint32 | Length of the payload, in bytes |
checksum |
uint32 | Checksum of the packet |
magic |
uint32 | Always command ^ 0xFFFFFFFF |
payload |
uint8[payloadLength] | Has different meaning defined by command |
All fields are little-endian, strings are in UTF-8 encoding, some strings require a null-character while some others not.
Checksum
Currently ADB protocol has two versions:
- Version 1 requires the checksum field. It’s calculated by adding up all bytes in
payload, ignoring overflow. - Version 2 doesn’t require checksum, so this field is always
0.
Maybe because ADB only transfers over a USB cable or a wireless router which is reliable enough, the possibility of bit flip is very low. And calculating checksum for large payloads is costing. So it was removed in second version.
More on versioning later.
Magic
It’s always taking the command field and xor it with 0xFFFFFFFF. Maybe ADB use it to detect packet boundaries. I’m not really sure.
Since checksum and magic are not affected by packet types, and payloadLength is always the length of payload field, I will omit them from now on.
First packet
Client will send the first packet to the daemon. It has following values:
| Field | Value | Description |
|---|---|---|
command |
0x4e584e43 |
‘CNXN’ in UTF-8 encoding |
arg0 |
See Version | ADB protocol version number |
arg1 |
See Version | Max payload size |
payload |
See Device banner | Device banner |
Note: ‘CNXN’ actually encodes to [0x43, 0x4e, 0x58, 0x4e], but since all fields are little-endian, it’s interpreted as 0x4e584e43.
Version
ADB now has two versions
| Version number | Android version | Max payload size | Requires checksum |
|---|---|---|---|
0x01000000 |
<9 | 4 * 1024 |
Yes |
0x01000001 |
>=9 | 1024 * 1024 |
No |
Most recent Android devices should support version 0x01000001.
Client and daemon will negotiate which version (and max payload size) to be used.
- Client sends a
CNXNrequest contains its max supported version and max payload size (less than or equal to version limit). - Client and daemon may need several packets to authenticate, these packets must not exceed
4 * 1024bytes because the other end may not support larger sizes. - Daemon responses a
CNXNpacket with its max supported version and max payload size. - Client and daemon uses a smaller value of two versions and max payload sizes for this connection.
Device banner is defined as following:
DeviceBanner :
DeviceIdentifier :: ParameterList \0
DeviceIdentifer :
host
device
bootloader
ParameterList :
Parameter
ParameterList Parameter
Parameter :
ParameterName = ParameterValue ;
ParameterName :
any Unicode code point
ParameterValue :
ParameterStringValue
ParameterListValue
ParameterStringValue :
any Unicode code point
ParameterListValue :
ParameterStringValue
ParameterListValue , ParameterStringValue
A CNXN request’s device banner should look like this:
1 | host::features={feature1},{feature2},...;\0 |
Note that the last ; and \0 are required for Android <9 to work.
Auth
If daemon requires authentication, it will send back an Auth request.
| Field | Value | Description |
|---|---|---|
command |
0x48545541 |
‘Auth’ in UTF-8 encoding |
arg0 |
1 |
Indicates token request |
arg1 |
0 |
Not used |
payload |
random string (20 bytes) | Token to be signed |
Token authentication
Client signs the received token with its RSA private key, and send a Token Auth response.
| Field | Value | Description |
|---|---|---|
command |
0x48545541 |
‘Auth’ in UTF-8 encoding |
arg0 |
2 |
Indicates signature response |
arg1 |
0 |
Not used |
payload |
RSA signed token (256 bytes) |
If daemon can verify the signature with any saved public key, authentication succeed.
If not, the daemon will send another Auth request with a different token, the client can try again with a different RSA private key (if it has multiple ones).
Public Key authentication
After the client has tried all its RSA private keys but no one succeed, the client can send its RSA public key to daemon
| Field | Value | Description |
|---|---|---|
command |
0x48545541 |
‘Auth’ in UTF-8 encoding |
arg0 |
3 |
Indicates public key response |
arg1 |
0 |
Not used |
payload |
Base 64 encoded ADB public key (701 bytes) | Not RSA public key |
The payload is 701 bytes long because:
- The ADB public key is 524 bytes long
- After base 64 encoding it’s 700 bytes long
- ADB daemon requires an extra null character at end
I really don’t understand what’s the point of base 64 encoding and extra null character, clearly the connection can transfer binary data directly right?
For how to generate the ADB public key you can refer to the source code directly. It’s some math that I don’t understand either.
Anyway, now this should popup on the device screen:
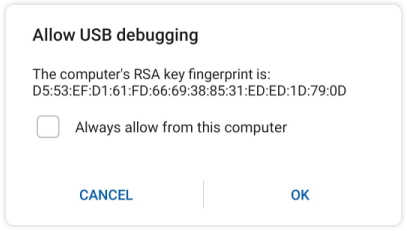
If the user tap OK, daemon will accept the connection. If the user also ticked the “Always allow this computer” checkbox, daemon will save this public key to its storage. So next time the same client connects, it can use token authentication.
There is no way for the client to know if the user tapped Cancel or they just ignored it.
Implement authentication
Clearly there are some states: each Auth request must be responded with a different key.
The solution I came out was generator function, more specifically, async generator function.
A generator function can take arguments, return a value, then pause its execution. When required, it will resume its execution and return another value. All local variables will be preserved between executions. And more important, generator functions in JavaScript can receive a value when resuming, which is not possible with other language, for example C#.
I also added key enumeration and generation to AdbBackend, since every runtime may have its own way of generating and storing.
At last a authentication method can be implemented like this
1 | export async function* AdbSignatureAuthenticator( |
It receives the first packet from argument, later it overwrite the packet variable name with newly received packets from yield.
I have to admit that this usage is very uncommon, and a little bit hard to understand without explanation.
Another huge downside is that invoking such a generator, especially a list of such generators (I need to support multiple authentication methods), is much much uglier. The only way to return a value to yield is manually invoking the next method. In this case error handling and iterator state management also has to be done manually, normally all being taken care by for...of.
However, because authenticators need to iterate through both key list and request packet list, there is really no elegant way to iterate through multiple lists at same time. You will end with doing all those dirty things manually anyway. My implementation won’t duplicate such logic in each authenticator so I think it’s still a better option.
Complete
Finally, if any authentication method succeeds (or the daemon is a debug build that doesn’t requires authentication), the daemon will send a Connect response, with these values:
| Field | Value | Description |
|---|---|---|
command |
0x4e584e43 |
‘CNXN’ in UTF-8 encoding |
arg0 |
See Version | ADB protocol version number |
arg1 |
See Version | Max payload size |
payload |
device::{device_banner} |
Device banner |
The response device banner looks like this:
1 | device::ro.product.name={product_name};ro.product.model={device_model};ro.product.device={device_name};features={feature1},{feature2},... |
features is used for feature detection. Some newer command or variants are not supported by older devices, ADB can test it with this field.
I don’t think ADB uses other fields.
What’s next
The core of ADB is a stream multiplexer. All ADB commands are based on streams. This means they don’t directly send ADB packets. Next time I will explain this in detail.
The next post should contains less “how does ADB work” thing and more implementation decisions and details. I believe so.